Whenever we review the spare parts catalogues of new customers, we see the same story. Page after page, most parts have no images. There are rows of identical titles, 100 "valves," 100 "gaskets”, 100 "panels," 100 "connectors", and not a single picture to tell them apart.
For customers, employees and technicians alike, identifying the right part from text alone is nearly impossible. It’s frustrating, slow, and prone to costly mistakes.
In the B2B world, particularly in the technical domain of spare parts aftersales, buying decisions are purely rational and transactional, driven by precise identifiers like part numbers and Material IDs. While in B2C commerce product images seeks to create want, in B2B spare parts images are required to eliminate risk. The tool for achieving the goal is the same: visual certainty.
The lack of visual data doesn’t just slow down identification; it creates costly misorders, longer support queues, and prevents automation tools like AI-based parts identification or self-service portals from generating the revenue growth your board is asking for.
This guide helps you close the missing image gap step by step. It shows which methods exist to create images, how fast they are, what they cost, and when to use each one.
The goal: full visual coverage for every part in your catalog, starting fast, cheap, and scalable.
Why It Matters
Every missing image has a cost:
Customer confidence drops: buyers hesitate when they can’t confirm visually.
Identification slows down: service teams rely on experts to double-check parts.
Return rates rise: wrong orders or orders with multiple parts happen when visuals are unclear or missing. Returns end as dead stock in your warehouse.
Automation stalls: AI tools like visual part identification or quality inspection need images to work efficiently.
High-quality product images build trust, accelerate service, and enhance any digital process. Without them, even the best systems are blind.
Step 1: Understand Your Visual Gap
Start simple: export your spare parts master data into a spreadsheet. For each item, note:
Material ID / Part Number
Image(s) available?
Part CAD File Available?
Machine CAD File Available
Procurement Notes
123-456-A
Yes / No
Yes / No
Yes / No
Festo 5072354
This gives you an image coverage baseline. You’ll instantly see which items already have usable visuals, which have CAD files, and which need new images. Procurement Notes can help you source images directly from your supplier or the OEM. CAD models can cover single parts or an entire machine. If only the full machine model exists, you can usually extract the single parts from it.
Step 2: Choose the Right Image Creation Method
There’s no single way to fill your visual gap. The most efficient approach combines multiple complementary methods.
Method
Time per Item
Cost per Item
Automation
Photorealism
Physical Item Required
Ideal Use Case
Synthetic Data (from CAD)
< 2 seconds
3.6 € + setup
Fully automated
80–99%
❌ No
Best as baseline for complete catalogs
Kaptura Photobooth
~5 minutes
~20 €
Semi-automated
100%
✅ Yes
Best for high-volume where CAD data is missing
Image Collector App
~2 minutes
Included in nyris license
Manual
100%
✅ Yes
Ideal for field technicians or warehouse staff adding images continuously
Customer Request Images via Portal
30 seconds (review time)
Included in nyris license
Continuous
100%
✅ Yes (provided by user)
Use real customer submissions to enrich your database
Traditional Photography
5–10 minutes + setup
150–200 €
Manual
100%
✅ Yes
Premium marketing material, product launches, or catalogs with high aesthetic standards
Together, these methods make it possible to achieve 100% visual coverage at a fraction of the cost and time of traditional photography.
Step 2.1: Source Images from OEMs
Before creating new visuals, check what already exists. Many original equipment manufacturers (OEMs) such as Siemens, Festo, and other major component suppliers maintain comprehensive, high-quality image libraries for their spare parts. These official images are typically accurate, consistent, and free to use for authorized partners.
Advantages:
Saves significant time: Many parts already have approved images available.
Ensures technical accuracy and brand consistency.
Reduces internal photography and workload.
Accelerates visual coverage for common components.
How to leverage:
Request access to OEM image databases or public media repositories.
Match part numbers with your internal SKUs to identify reusable images.
Use an automated script or connector to link the OEM visuals directly to your catalog.
We can support by establishing OEM collaboration and data mapping workflows.
This approach works particularly well for commonly used parts from major suppliers, quickly improving coverage without additional cost.
Step 3: Start with Synthetic Data from CAD - 0% Hallucinations, 100% Multi-View Consistency
Synthetic data is the fastest and most affordable way to build your foundation when you own CAD data for your parts or machines. It converts your 3D CAD files into photorealistic images. No photography, no logistics, no physical parts needed. Once set up, the flow can be fully automated.
Benefits:
Costs start at 3,60 EUR per part for 6 images, compared to €200+ for manual photography.
Consistent lighting, angle, and background for every image.
Scalable to millions of items, up to 100k images per day.
Fully compatible with AI-based search and identification.
How to start:
Send us a sample of your CAD data.
We will generate free synthetic images.
Review quality and approve your preferred style.
Scale up. the process runs automatically from there.
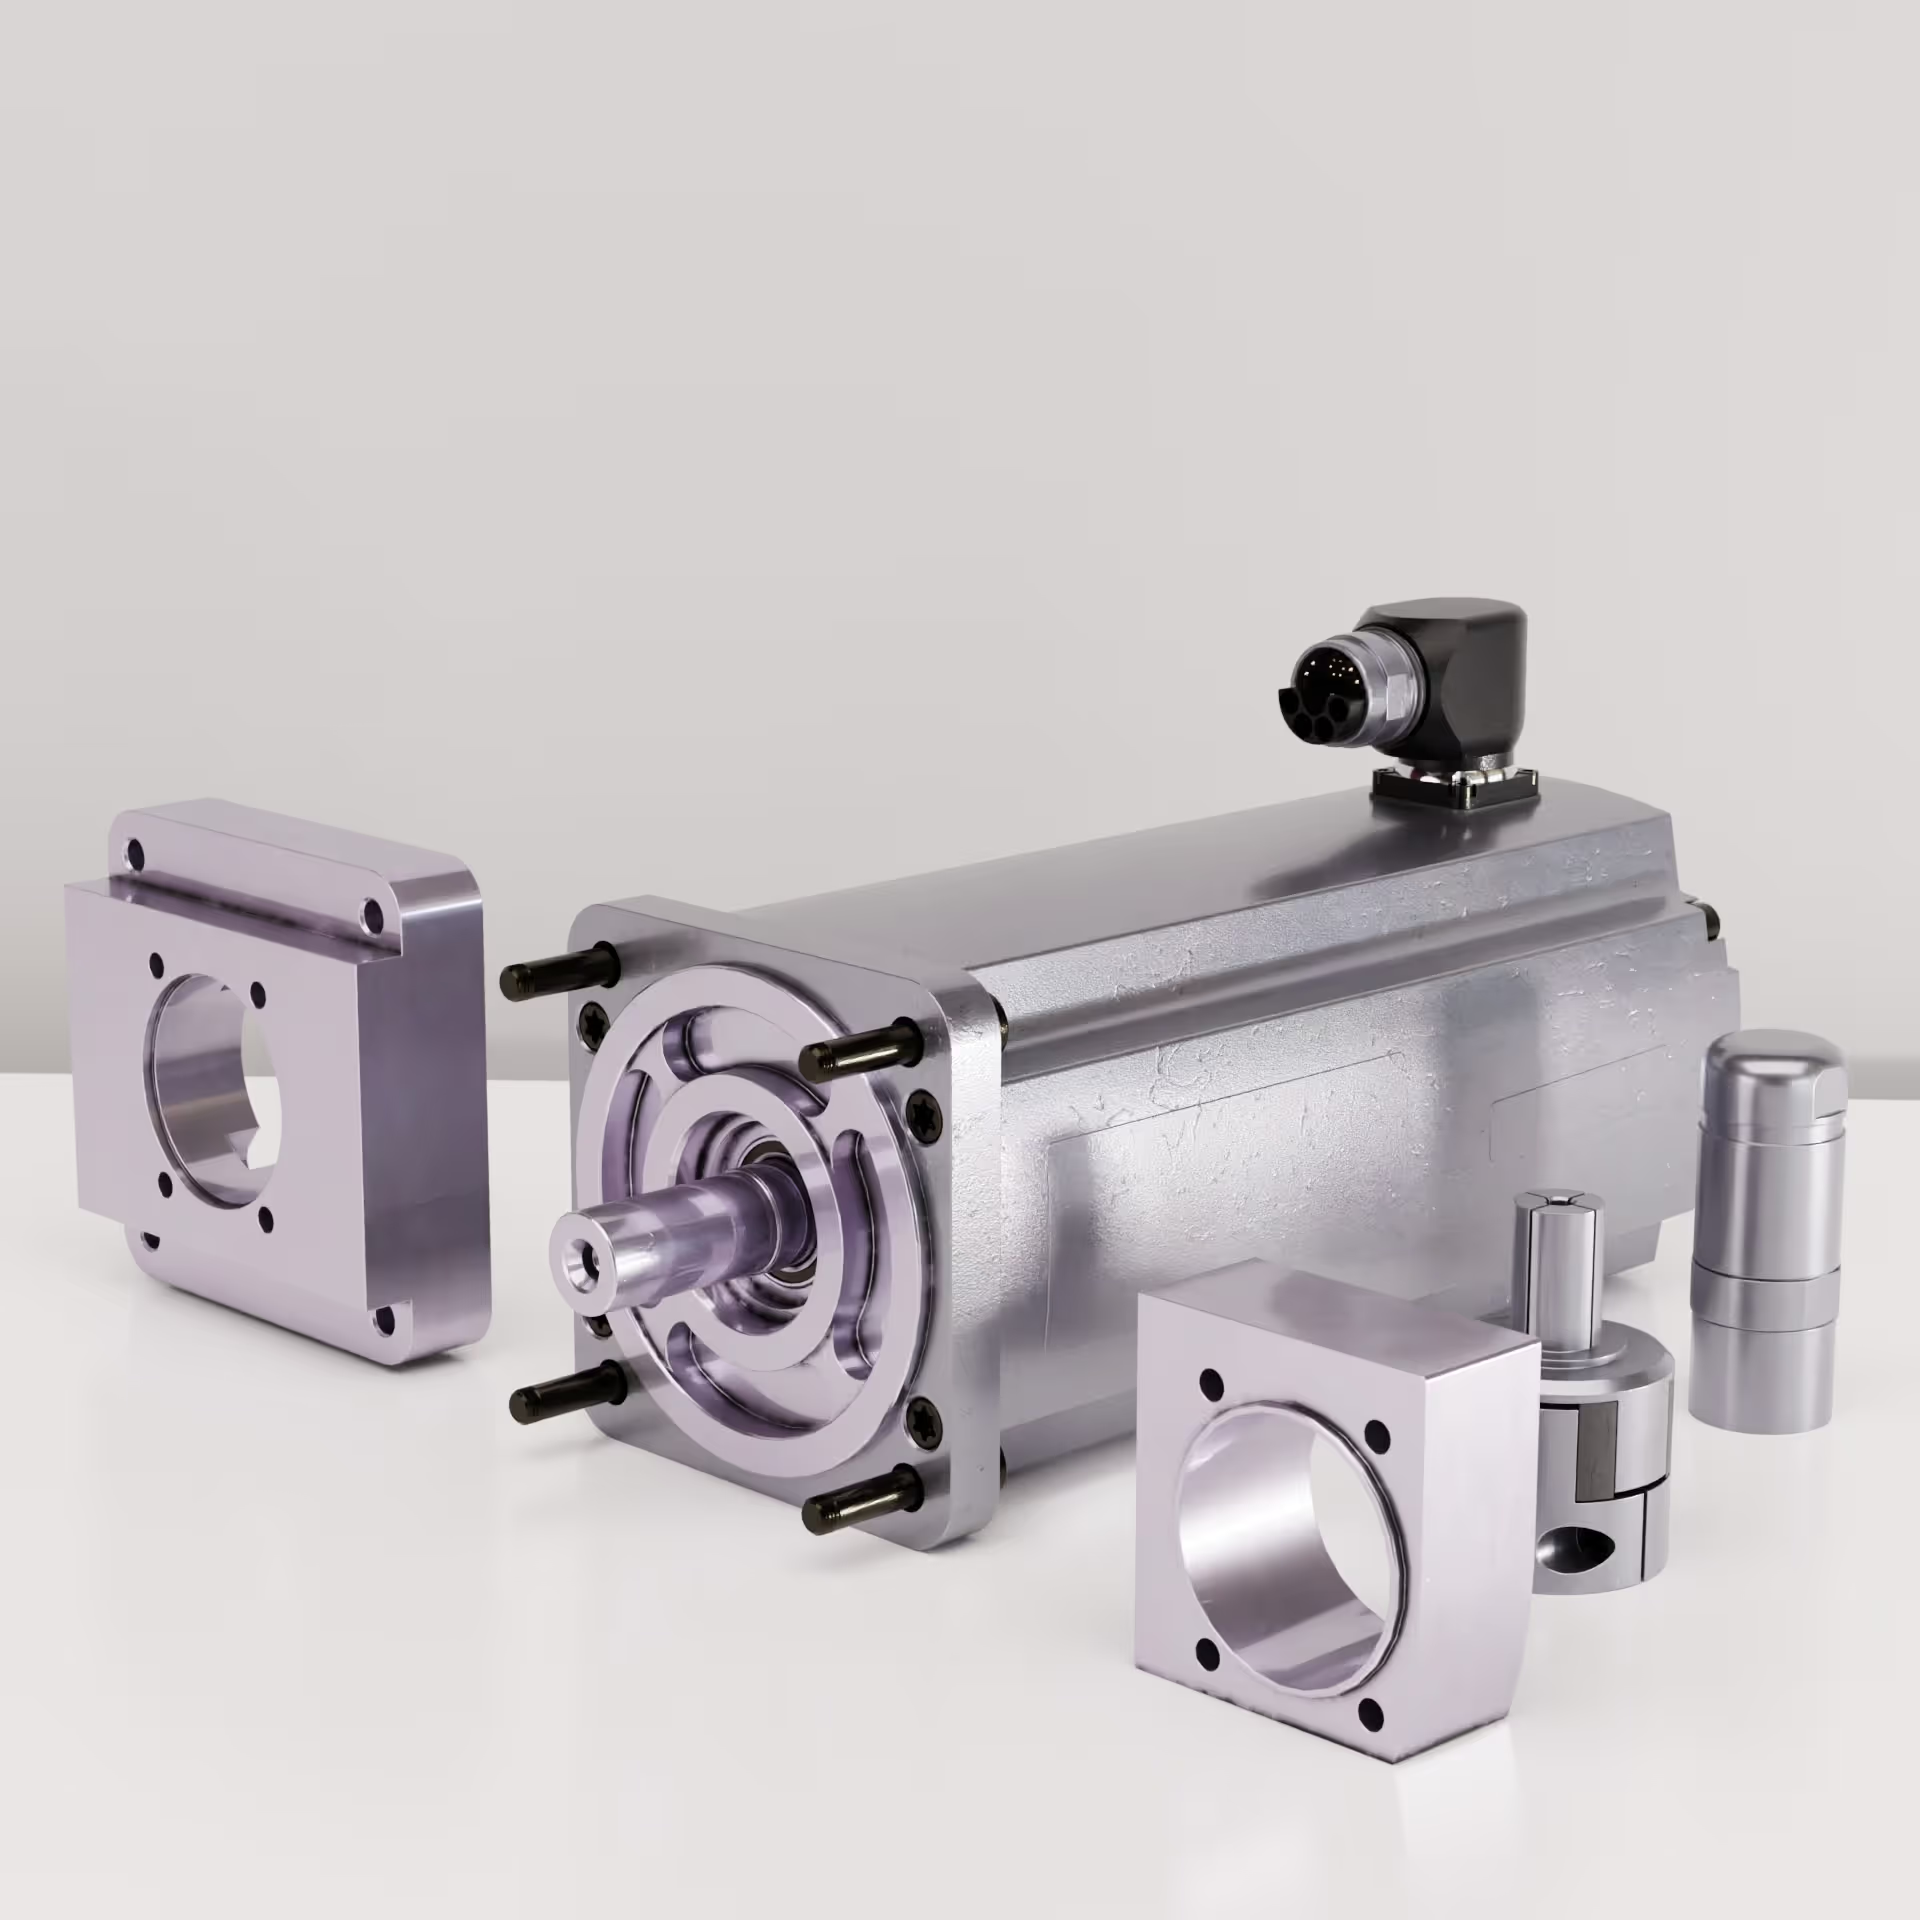
With the nyris AI Assisted Synthetic Data Process your entire catalog can have realistic images within weeks. It’s not a 3 year project with a 2 Million EUR Budget. You get a full base catalog coverage at a fraction of the costs and time of real photography and can use it directly in your portals, service apps, technical documentation, after sales commerce solution or as warehouse labels.
Example of synthetic images from a CAD File generated with AI Assisted nyris synthetic data pipeline
Step 4: Capture Real Images Where It Pays Off
Once synthetic coverage is complete, focus on items where real photos make a business difference or CAD data is missing. Typically your top sellers, fast moving or most returned items.
Option A - Kaptura Photo Booth
Kaptura offers a fully integrated capture booth system we recommend due to the price, simple integration and ease of use. Employees place the part in the booth; the system automatically takes photos, measures dimensions, weight, and generates a 3D point cloud. You are not only receiving multiple images, but also the size and weight of the item which you can use to optimize shipping and storage.
Why it works:
Easy to operate: warehouse staff can run it without a studio setup.
Produces both 2D images and 3D data for marketing and commerce.
Best suited for parts where visual appearance matters or CAD data is missing.
With two machines, 3 shifts, you can capture images for roughly 5000 parts per Month
We can sync Images from the Kaptura Cloud directly with our visual search index and make those available for visual identification
Kaptura IMS 360 Photo Booth
Option B - Image Collector App
A lightweight alternative for distributed teams. Warehouse employees, technicians, or even interns can capture images directly during their regular work. The app automatically tags and uploads the image to your spare parts database.
Why it works:
No extra equipment needed, just a smartphone.
Real photos from real environments.
Perfect to improve AI visual identification solutions
Option C - Traditional Photography
Professional photography remains the gold standard for marketing and brand use. But it’s not required for 99% of your parts.
When to use it:
For high-value components, product launches, and marketing materials.
When precise color rendering and aesthetic appeal are essential.
Limitations:
Requires physical items, lighting setup, and professional staff.
Slow and expensive to scale, typically 150–250 € per item or more + setup costs
Not suitable for large catalogs.
Step 5 - Generate Images with Generative AI Models
Emerging Generative AI models now make it possible to create images directly from text prompts, sketches, or drawings. This method is fast and flexible, particularly useful when CAD models are unavailable or when you need early visuals for parts.
Strengths:
Can create new visuals from minimal input (even a simple drawing or written description).
Useful to scale visual identification training datasets where perfect visual accuracy is not critical.
Can enhance or refine existing synthetic images from CAD files for a more realistic look.
Extremely fast to iterate, multiple style or lighting variations can be generated instantly.
Limitations:
Generative AI models still produce hard to control inconsistencies or hallucinations, especially for technical parts.
It's often required to generate multiple candidates with slight variations in the prompt and choose the right results.
Not yet reliable enough for marketing or commerce catalogs of technical parts where 100% correctness is mandatory.
Should always be validated before adding to production databases.
Best practice:
Use Gen AI images to complement your data or to augment training or test data sets for the development of visual AI models.
The technology is advancing quickly and we are committed to investing in research. We recently launched a research project with the LMU Computer Vision Group, led by our advisor and inventor of Stable Diffusion, Prof. Dr. Björn Ommer.
Let's try it
If you want to get an idea of Gen AI generated images for yourself, here is a simple flow to experience the capabilities of today models:
3. Upload the sketch of your part or any visual reference you might have for the part and the following prompt:
// --- Command —
Your job is to improve or create the images of spare parts. The final part must be perfectly isolated on a seamless, clean, pure white background (#ffffff) without any watermarks.Masterpiece, best quality, ultra-realistic, 8k uhd, professional commercial product photography.
// --- Product Context —
Faltenbalg mit Anschlagplatte
// --- Technical Directives —
Render the object with hyper-realistic materials and textures.
Create soft, physically accurate studio lighting that reveals the object's form and texture.
Strictly preserve the original object's exact geometry, shape, contours, holes.
The object must be perfectly isolated on a seamless, clean, pure white background (#ffffff).
DO NOT add any watermarks. DO NOT add text. DO NOT add Logos. DO NOT add extra objects.
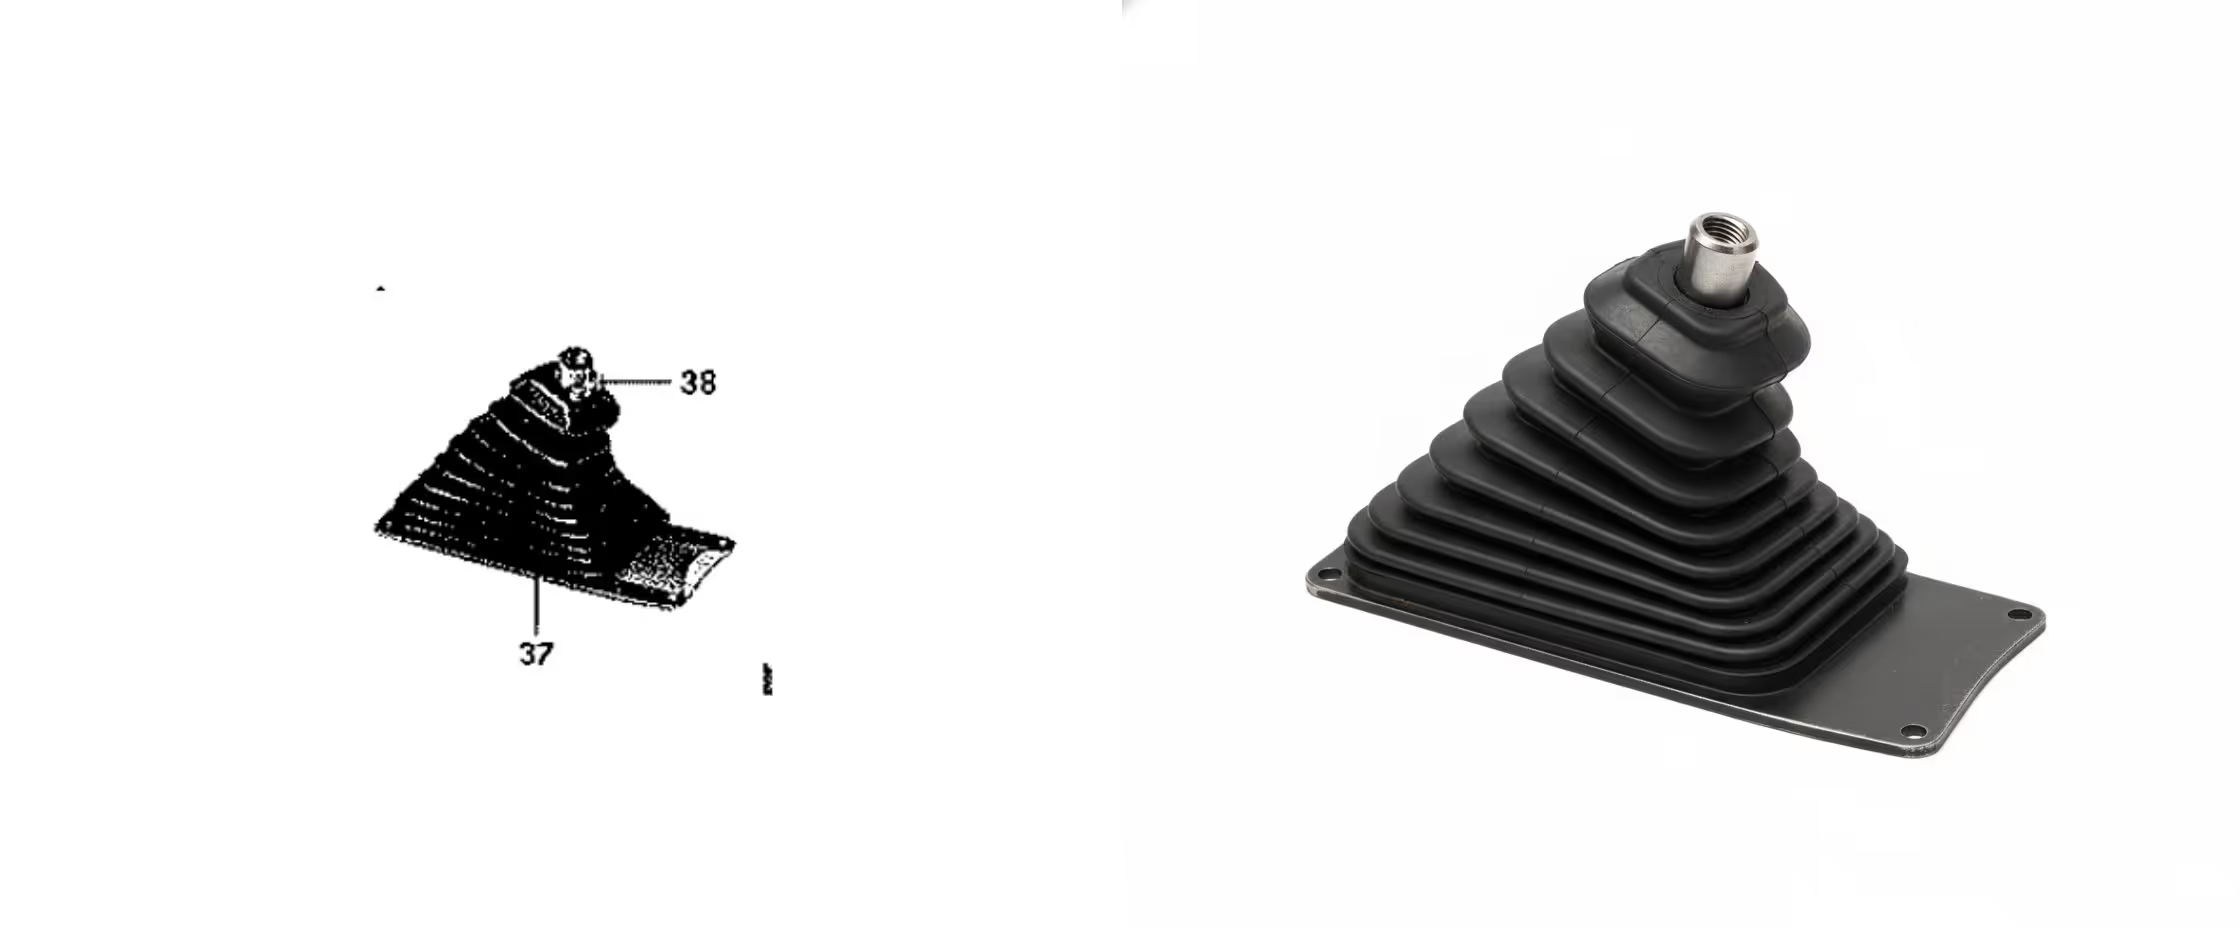
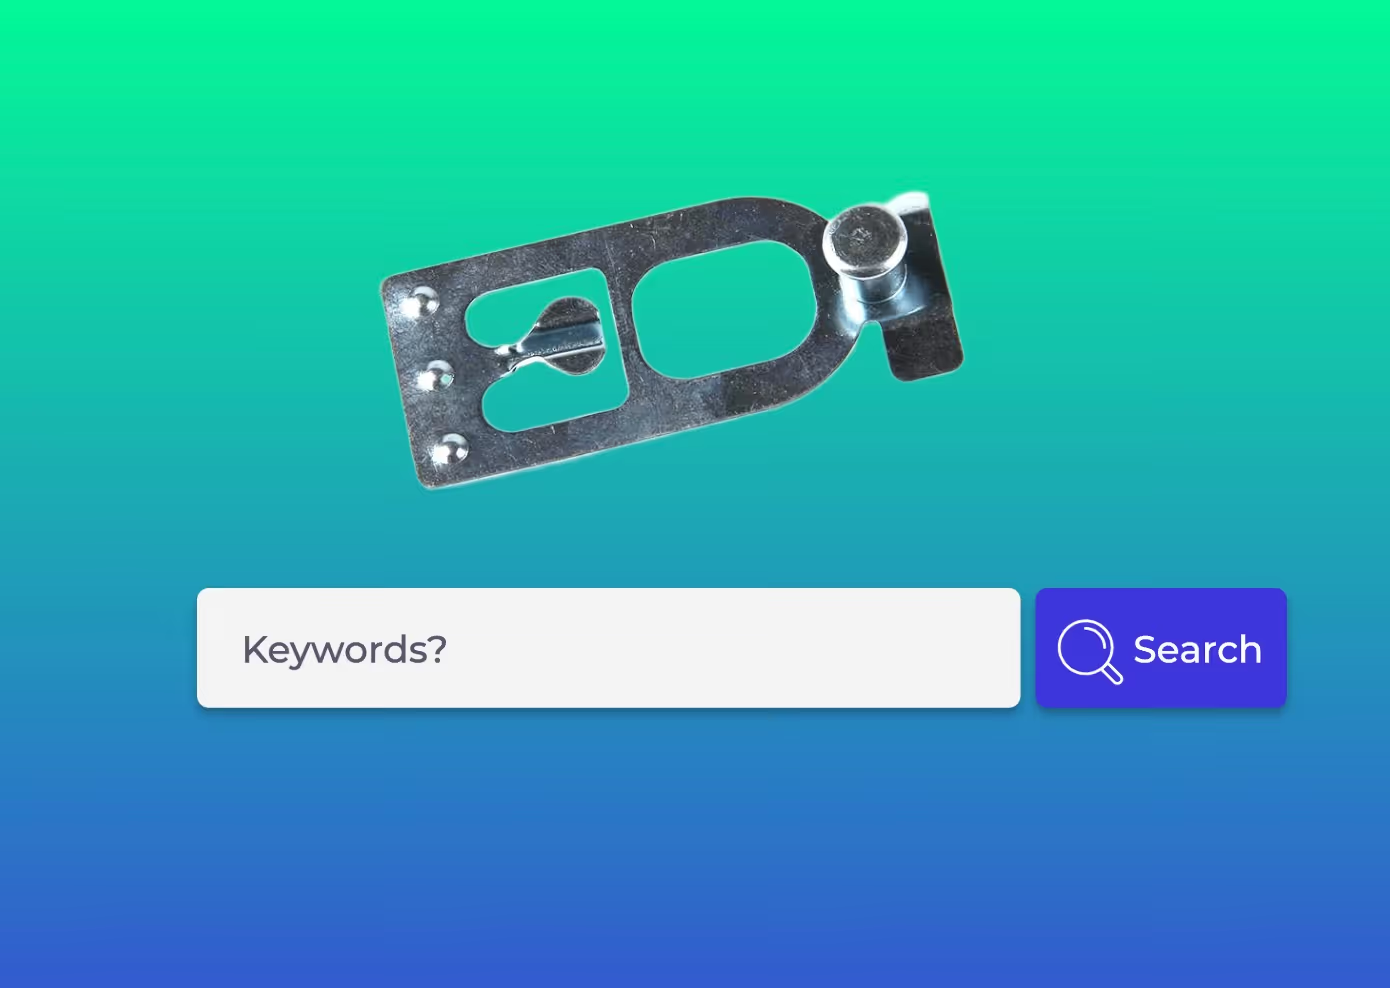
Here is an example result with the above prompt and a sketch from a 1961 paper catalog as source.
Generated image of a gaiter with with an image of a 1961 paper spare parts catalog as source
4. Or just use the prompt without any images, it does work well for generic parts, for example:
// --- Command ---
Your job is to improve or create the images of spare parts. The final part must be perfectly isolated on a seamless, clean, pure white background (#ffffff) without any watermarks.
Masterpiece, best quality, ultra-realistic, 8k uhd, professional commercial product photography.
// --- Product Context ---
hexhead, full thread, M10 screw
// --- Technical Directives ---
Render the object with hyper-realistic materials and textures.
Create soft, physically accurate studio lighting that reveals the object's form and texture.
Strictly preserve the original object's exact geometry, shape, contours, holes.
The object must be perfectly isolated on a seamless, clean, pure white background (#ffffff).
DO NOT add any watermarks. DO NOT add text. DO NOT add Logos. DO NOT add extra objects.
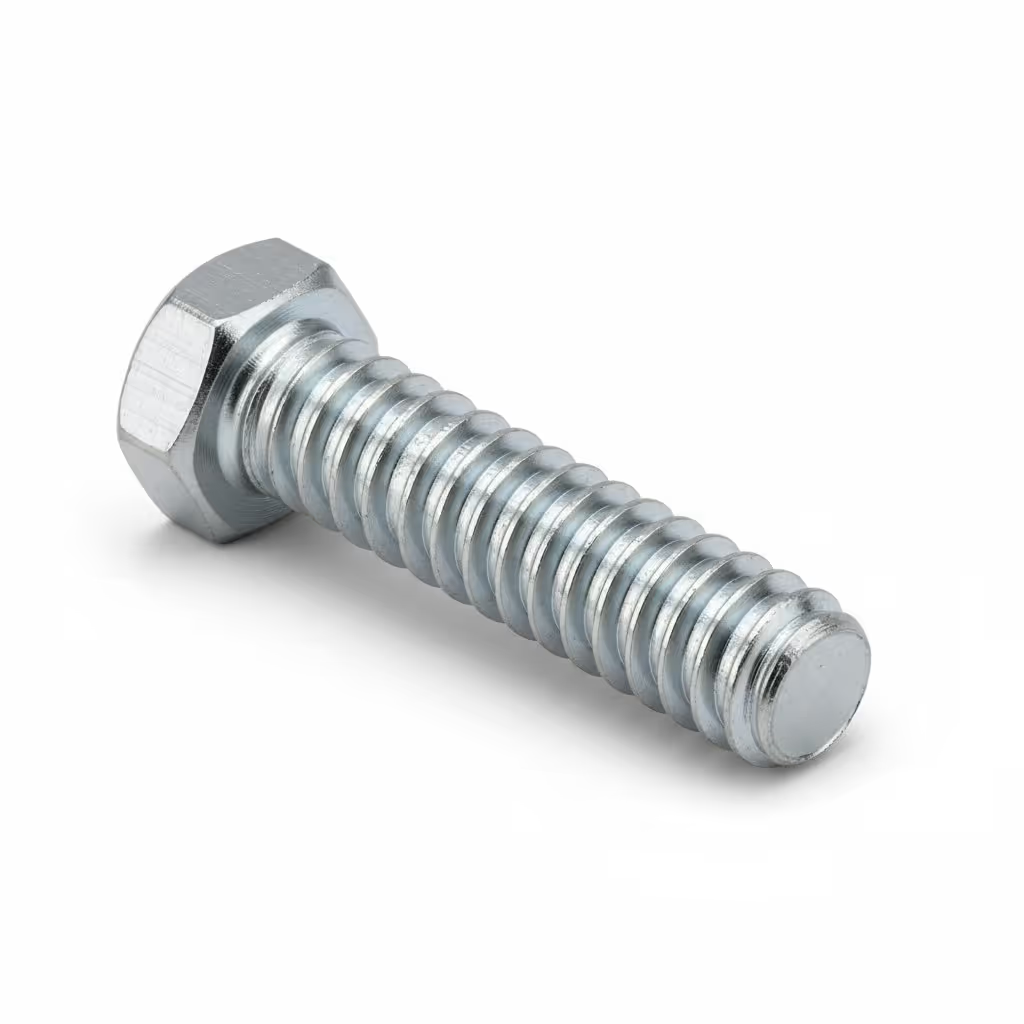
You should receive a results similar to this image:
Generated Image of a hex head M10 fully threaded screw
Gen AI is not there yet to generate highly accurate, consistent, multi view representations of complex parts. But it’s already a great tool to generate images that can significantly help you scale and enrich your data for AI driven identification solutions.
Step 6 - Use Customer Search Images to build your Visual Knowledge Base
Every customer image submitted through visual search or support channels is a chance to expand your real-world image database.
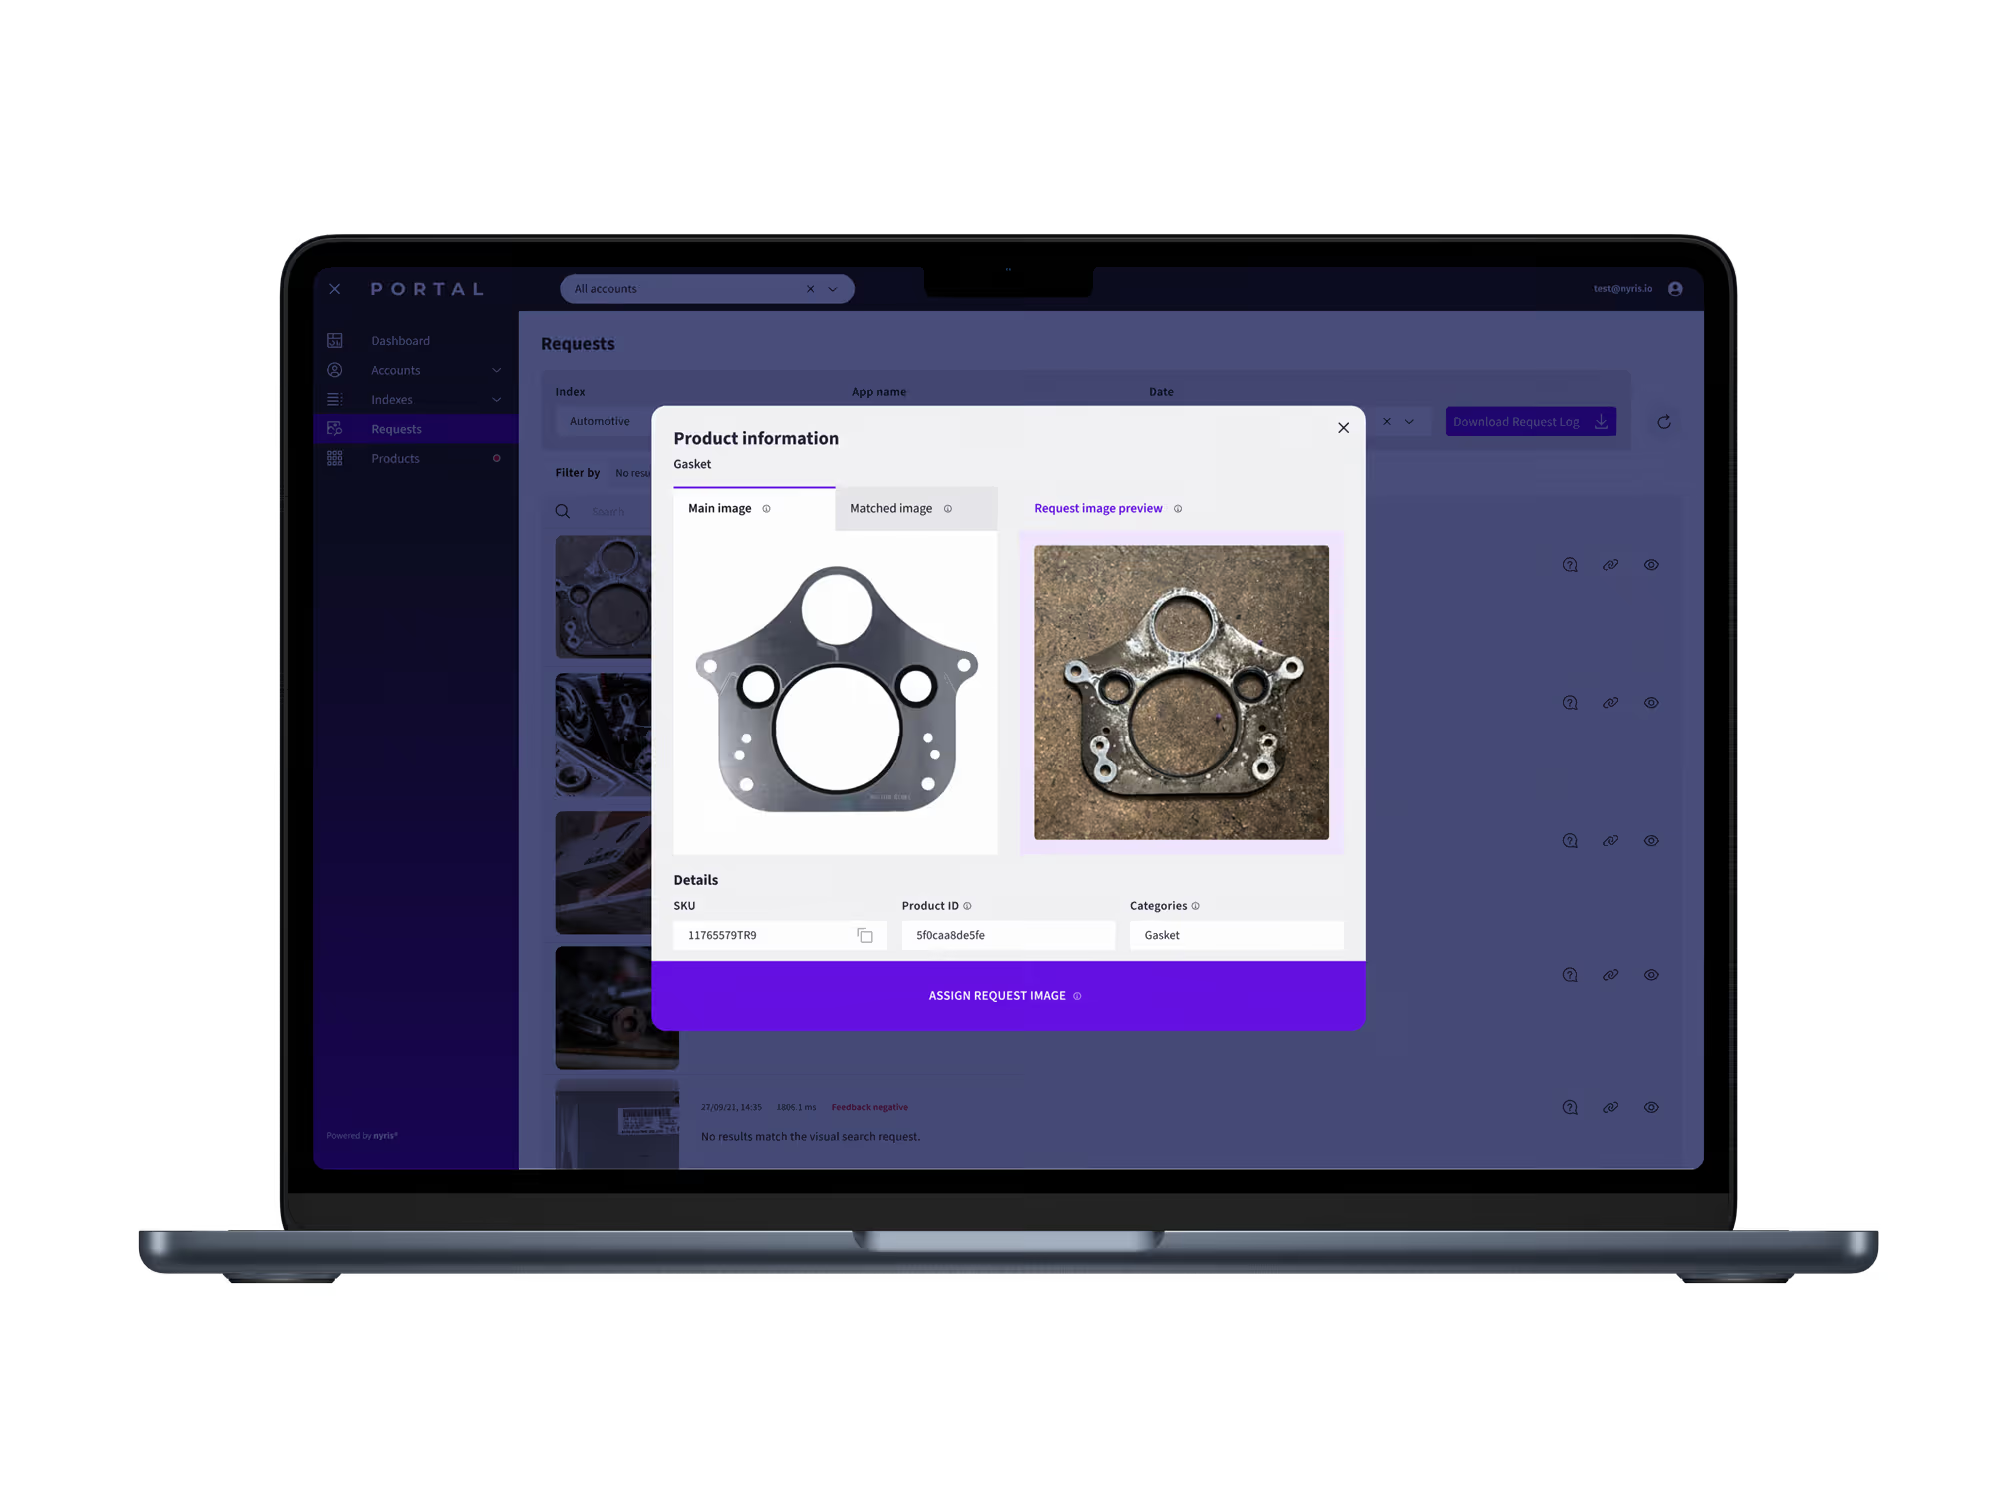
Start tagging images received through your support channels. Using the nyris visual search portal, your team can also review incoming images for visual identification, assign them to the correct product, and instantly make them searchable.
This process:
Improves accuracy for future visual identifications.
Builds a living visual dataset that grows with every customer interaction.
By continually incorporating customer-submitted images, you transform every interaction into an opportunity to build a self-improving, highly accurate visual dataset. This growing, real-world knowledge base is a highly valuable future-proof asset that ensures visual search remains accurate, relevant, and robust.
Creating a visual knowledge database by adding customer images in the nyris portal
Step 7 - Keep Your Visual Data Alive
Once your baseline is complete, visual coverage becomes an ongoing process, not a one-time project.
Maintain and Monitor:
Coverage KPI: % of parts with at least one valid image.
Identification Accuracy: % of correct hits in visual search
Return Rate Reduction: fewer wrong parts ordered.
Time to Identify — how quickly teams can find the right part.
Improve Continuously:
New parts: generate synthetic images automatically.
Updated or popular parts: schedule Kaptura or photography refreshes.
Field or customer uploads: review and assign weekly.
This loop keeps your visual data fresh and AI-ready.
Cost and Time Overview
Method
Typical Cost per 1,000 Parts
Time to Complete
Requires Physical Part
Ideal For
Synthetic Data (CAD)
360 € + setup
Hours
No
Full catalog baseline
Kaptura Booth
~20,000 €
Weeks
Yes
High-volume parts / parts without CAD Data
Image Collector App
Included in nyris license
Ongoing
Yes
Continuous coverage improvement
Customer Portal Images
Included in nyris license
Continuous
Yes
Enrichment through real-world submissions
Traditional Photography
~200,000 €
Months
Yes
Premium visual assets
The Smart Sequence to Follow
Synthetic Data First: fast, scalable, complete baseline.
Kaptura Next: real photos for top sellers and marketing visuals.
Image Collector App: continuous input from your teams.
Customer Submitted Images: natural enrichment from user activity.
Traditional Photography: only for premium marketing or product campaigns.
This sequence gives you immediate visual coverage while keeping costs and operational effort low.
Final Takeaway
Creating images for your spare parts catalog isn’t a photography project, it’s a data quality initiative. Each new image increases your system’s intelligence, reduces errors, and builds trust with every customer and employee interaction.
Start with what you have, automate what you can, and let real usage guide improvements.